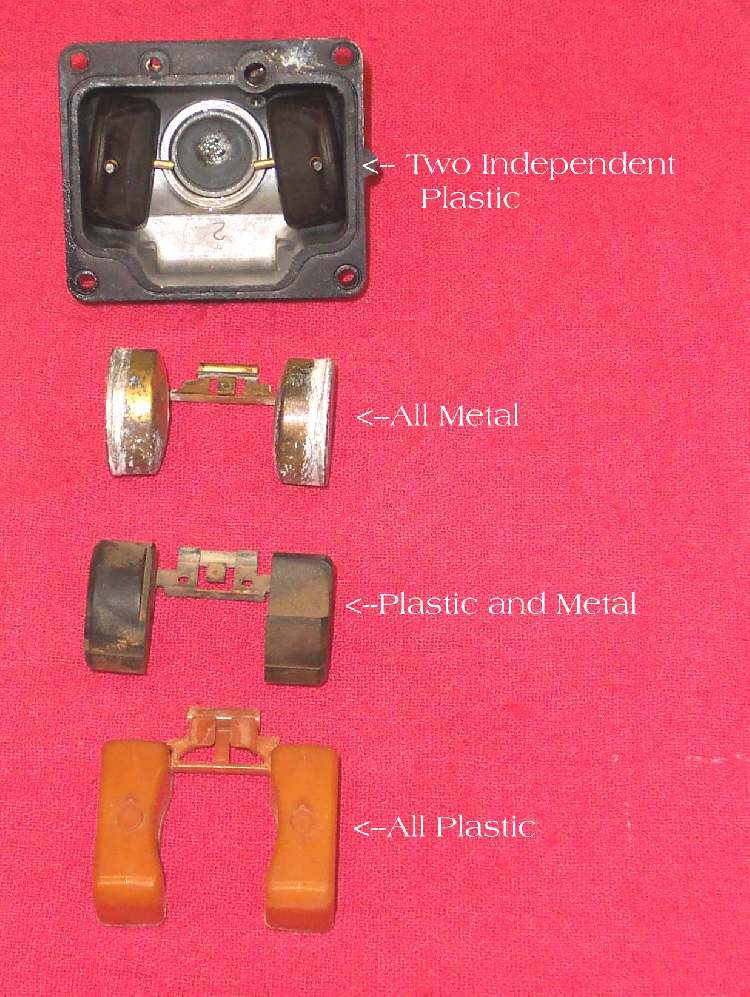
The XS11’s fuse block is a notoriously weak point of an otherwise fine motorcycle. So I decided to replace my fuse block. It looks and works great and fits in the same place as the original fuse block while giving you two additional fuse connections.

The place to buy an Auxiliary Fuse Block is J.C. Whitney. (Part No. 03dh7115w). It costs about $24.95 + shipping and uses spade type automotive fuses. Don’t get any of the other fuse blocks from JCW because they won’t work for our application. This is the only one they sell which has independent in and out leads. All the others have one input and multiple outputs. Great if you’re adding a ton of accessories but inappropriate as a replacement for our fuse block.
You don’t have to know anything about electronics but you do have to work methodically. Don’t remove any wires until you’re ready to do the whole job. Even then, only work with one wire at a time so you don’t connect things incorrectly.
Parts you’ll need:
– Auxiliary fuse block from J.C. Whitney (part number 03dh7115w)
– 8 ea female spade connectors (pref. insulated)
– Crimping tool (my favorite crimping tool is a pair of Vice Grips)
– Wire cutters
– Wire stripper
– New automotive type spade fuses (matched to the same values as the tube type fuses)
– Small piece of 1/8 aluminum to be used as a backing plate for Auxiliary fuse block. 1.5 x 4.25
– 2 small nuts, washers and bolts to attach fuse block to backing plate. (You’ll need to keep the bolts which hold the existing fuse block to the frame)
– 2 rubber grommets (as standoffs to fill gap between backing plate and frame.
Procedure:
-Unscrew the bolts which hold the plastic fuse block in place. Leave all the wires in place in the old fuse block at this time.
-Take the aluminum backing plate and trace the holes from the original fuse block onto the plate.
-Now trace the holes from the new fuse block onto the aluminum backing plate. Make sure the holes aren’t too close to allow clearance for the mounting bolts.
-Drill holes in backing plate.
-Using a new razor blade and a delicate touch, cut back the wrapping on the wiring harness about 2 inches. This will give you more of the wires to work with.
-Take a roll of masking tape and make little marker flags for each wire coming into the old fuse box. Make sure the flags are about 3/4 inch above the connector. Label each pair of wires (Ignition, Headlight, etc.) so that you don’t screw up the connections.
-Carefully remove the wires from the old fuse box. I used a small screwdriver to release the old fuse holders from the plastic box.
-With wire cutters, cut off the old fuse holders as close to the crimped connection as possible.
-Strip off about 1/4 inch of the insulation and crimp on one of the female spade connectors for each wire. (I know that Doug likes soldering these connections and that’s fine but it’s kinda hard to work with wires which are so close to the bike.) Using Vice-Grips to crimp these connectors has worked much better for me than the special crimp tools they sell for that job.
-Don’t use the sheet metal screws that come with the new fuse block. Instead, use appropriate sized bolts to attach it to the backing plate. I chose to have the heads of the bolts on the back side of the backing plate to make sure the extra length of the bolt doesn’t dig into the frame plate.
-Use the rubber grommets on the bolts on the back side of the bolts which attach the backing plate to the frame plate to make sure that the assembly mounts securely.
-Attach the wires to the connectors. I found that having the wires come around the right side of the fuse block (instead of having the wires come around the left side in the stock fuse block) puts less stress on the wires. I did have to change the order of the fuses and wires because one pair of wires seemed a little short to provide a stress free connection.
-I used a drawing program to create a label to attach inside the clear plastic cover. I glued it in by “painting” the front side of the label with white glue and putting it in the inside of the plastic cover. (don’t worry that you can’t read it right now – when it dries it will be clear.) make sure you glue it in right side up as the cover will only go on one way.
-Plug in the appropriate fuses and place the clear cover over the fuse block. (You can remove the masking tape flags if you’d like to make it look prettier.)
JP Honeywell
Carburator Theory and Tuning
Posted by blogengineeringindonesia pada Agustus 24, 2008
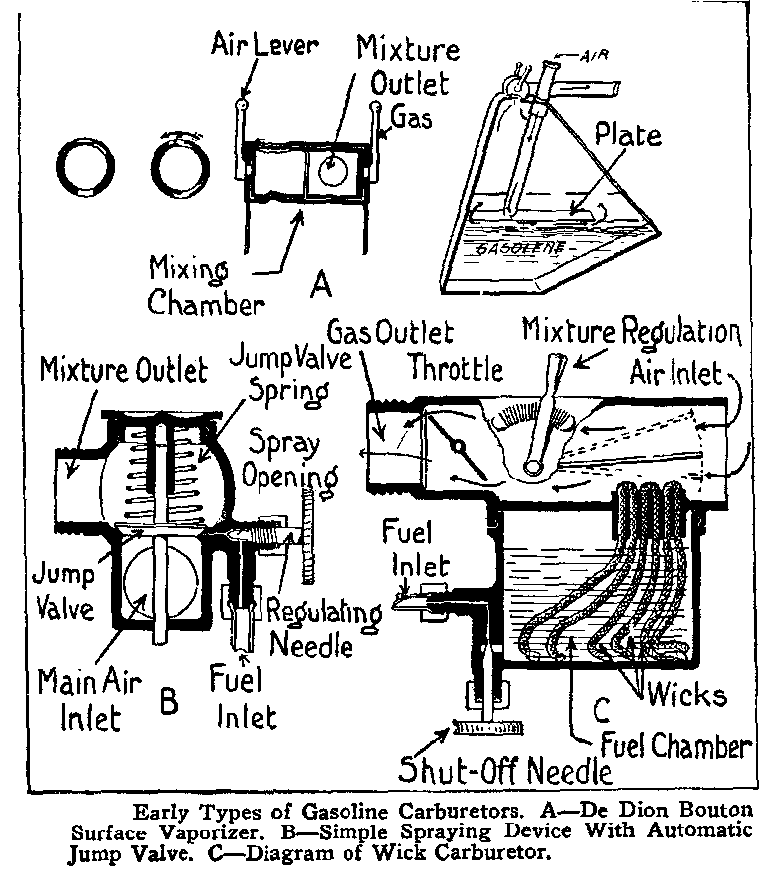
For some reason everyone seems to think tuning a carb is just real easy. Change a jet or two and boom, your there. Yeah, right ! There are quite literally millions and millions of jet combinations. A rough check on Bing carbs shows there are at least 13,860,000 different combinations of jets. If you are going to change carbs you’d better be prepared to spend some time and money on the job.

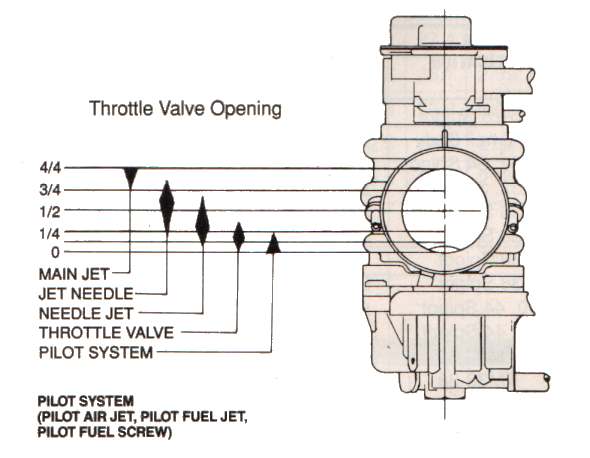
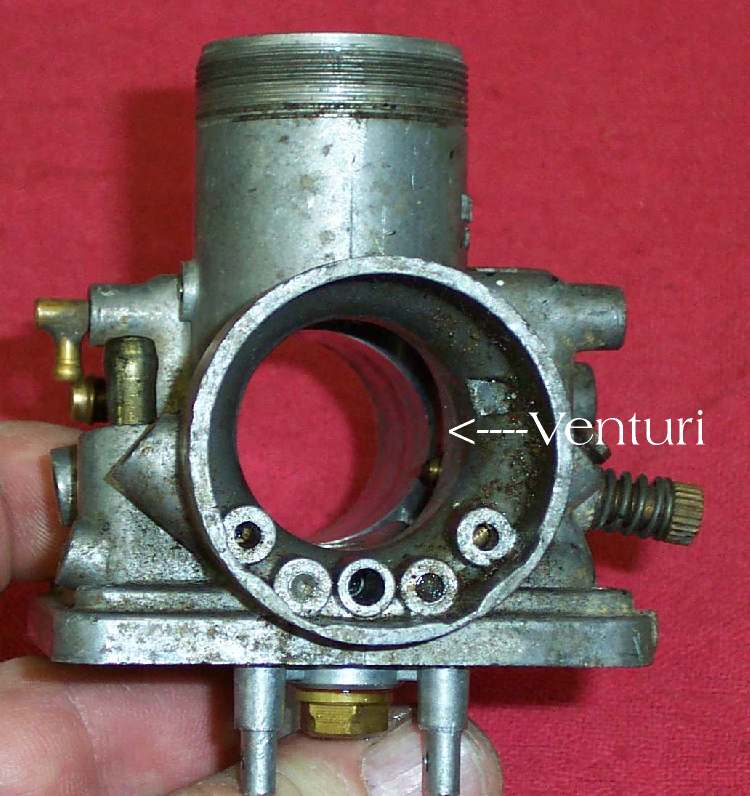
 If you look at a carburetor, you will notice a rather large hole going from one side to the other. This is called a Venturi. Air passes into the engine through this hole (Venturi). As the velocity of the air entering the carb (and then the engine) increases, it’s pressure decreases, creating a low pressure or vacuum in the venturi. This vacuum moves around in the venturi, as the throttle is opened, and sucks gasoline through the different jets in the carb. The gas then mixes with the air going through the venturi. The way the jets are made causes the fuel to vaporize as it goes into the venturi. Where the jets are placed in the carb and where the jet’s outlet is located in the venturi, determines what part of the throttle opening that jet controls. The idle jet system (comprised of pilot air jet, pilot fuel jet and pilot fuel screw) controls from 0% to about 25% of the throttle opening. The throttle valve controls 0% to 35% of the throttle opening. The needle jet and jet needle control from 15% to 80% of the throttle opening and the main jet controls 60% to 100%. This means that when you open the throttle about one eighth of the way open, all of the gas/air mixture going into your engine is controlled by the idle jet. As you can see, the different jets over lap the operating range of each other. That is, the jet needle starts to effect things before the effect of the idle jet ends. This is something to remember when working on carbs… everything is interconnected. Change one thing and it will effect other things.
OK, let’s go over the different systems in the carb and see what they do.
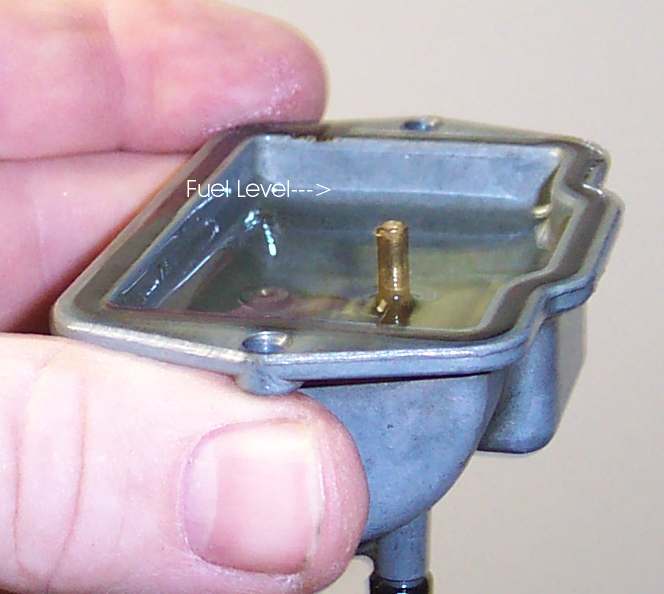
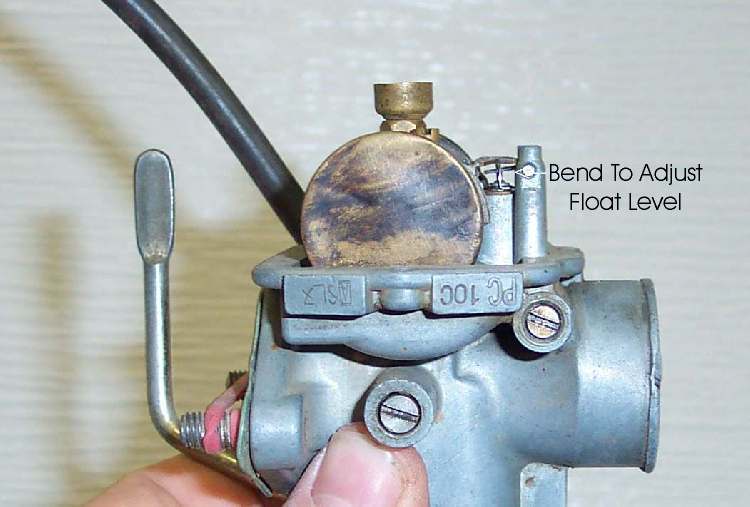
- Fuel level. The fuel level is controlled by the fuel floats and the fuel float valve. The floats are hollow or made of something that will float on gasoline, such as cork. Part of the float presses against the float valve, sometimes called a needle and seat. Most times the part of the float that touches the float valve needle is bendable so you can adjust the level of the fuel in the floatbowel. All plastic floats are not adjustable. If this level is way too high, gas can leak out the carb overflow tube or into the engine. If fuel gets into the engine it will thin out the engine oil, ruining it’s ability to lubricate. This will, sooner or later, blow up your engine ! If a full tank of gas in the evening turns into a half tank by morning, check your oil. If it’s thin and smells like gas, change it and replace your float valve and/or check your fuel level. If the oil is OK, check under the overflow tube. If it’s OK, then check where you are parking your bike ‘cuse someone is walking away with your gas !If your fuel level is just a bit high, the mixture will tend to be a bit rich. If it’s low, the mixture will tend to be a bit lean. This is because a high level takes less vacuum to suck fuel into the engine and a low level takes more vacuum to do the same.
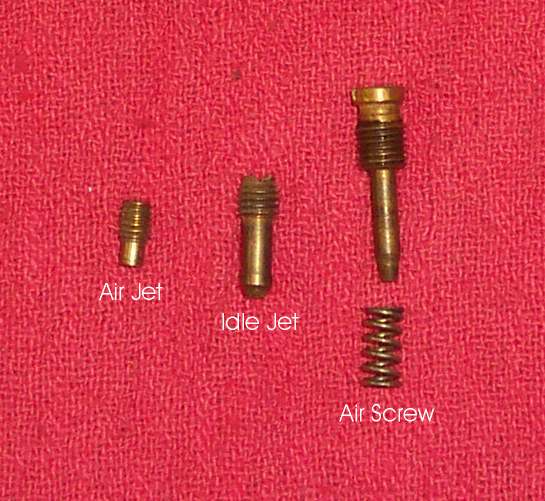
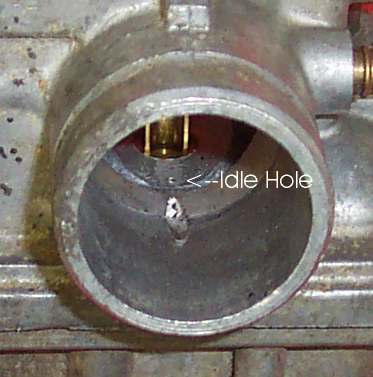
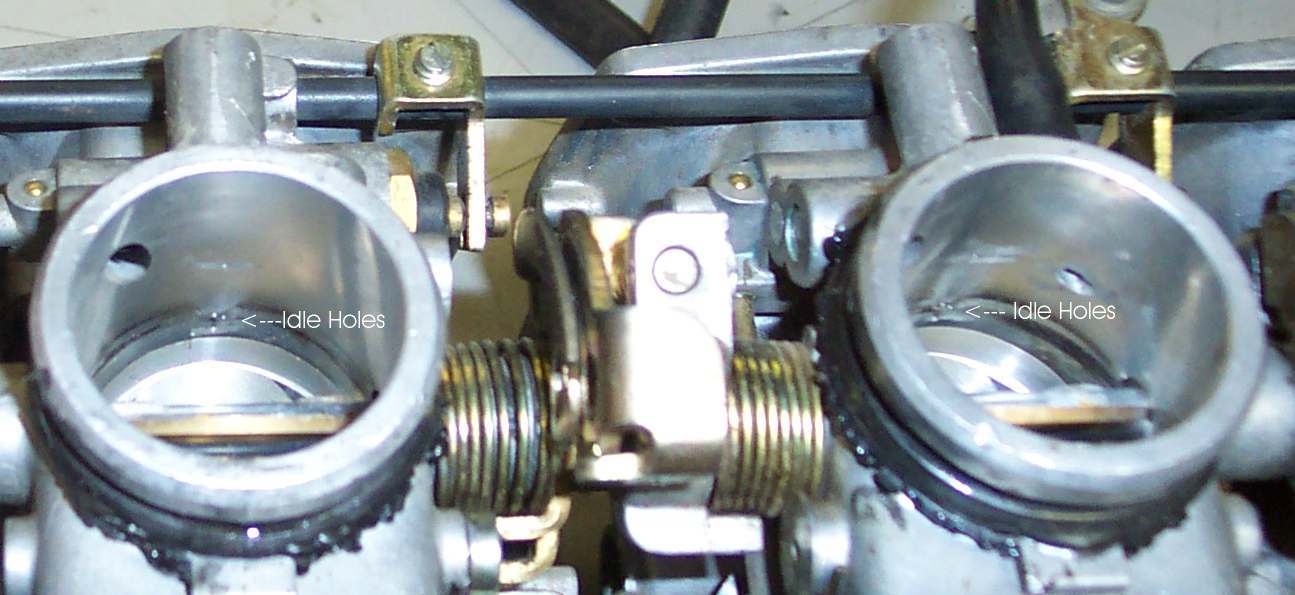
- Pilot or idle jet system. The idle jet controls the idle and on up to quarter throttle, give or take a bit. On some carbs, like Mikuni there is an air jet too. In conjunction with the idle jet there is an idle jet air screw. This screw leans or richens the fuel mixture for a smooth idle and on up to one quarter throttle. From the idle jet, there are little passages cast into the carb that lead to holes just in front of the throttle valve or plate. There can be just one holeor there can be several, depending on the carb design. They effect the mixture as long as the vacuum, in the venturi, is over them. As the throttle opens further, the vacuum moves to the needle jet and jet needle.
- The Throttle Valve. The big slide that opens and closes your throttle has a bevel angle cut in one side of the big round (can be flat, too) slide, toward the air cleaner. This angle comes in several sizes and helps control the fuel mixture from idle to about 35% open throttle.
- Needle Jet. This jet doesn’t really even look like a jet, but it is ! It controls the fuel mixture from 15% to 60% open throttle. It sets in the center of the carb, right over the main jet.
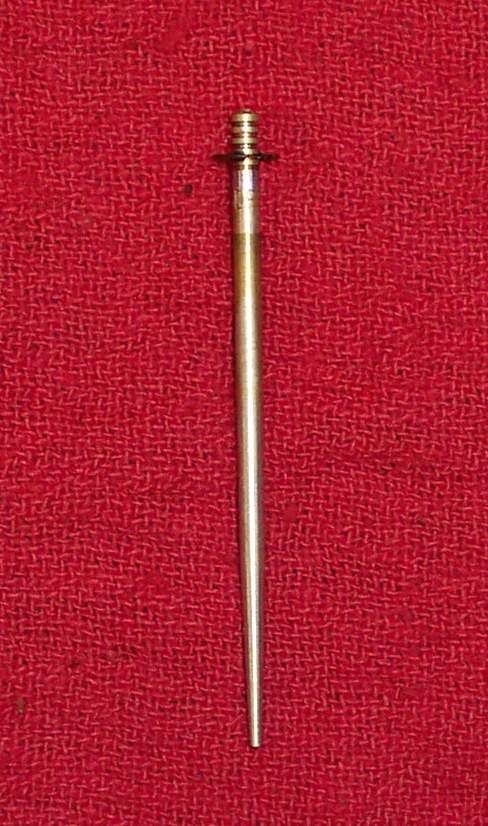
- Jet Needle. This is the needle that rides in the throttle slide and goes into the needle jet. This needle controls the fuel mixture from 20% to 80% open throttle. It can come in many different sized tapers. Sometimes, one needle can have several tapers on it. The top end of the needle has grooves cut in it, usually five, and you can move the little clip on the end up or down to lean (down) or richen (up) the mixture. Most late model bikes have needles with only one groove cut in them. This is so you can’t richen the mixture, thereby keeping the EPA happy.
- Main Jet. This jet controls the fuel mixture from 60% to 100% open throttle.
We want nice clean acceleration from idle to full throttle, with no stumbling or flat spots. This can be quite a tall order if we are starting with a new carb. Actually, it can be a real challenge to get things to carburate right after something as simple as an exhaust pipe change.
Now, I wish I could tell I’m the great carb man, but, well… no one has ever been dumb enough to hire me to really work over a carb. Well, there was that one time with that Kaw 650 and aftermarket pipes. It had some kind of weird stock carbs that looked like Mikunis but really were not. It had TDK or KDT or DTK, something like that, carbs. It had aftermarket exhaust pipes and was running too lean, and stumbled at one point under acceleration. Worthless pig ! The jet needles where not adjustable, so I put little washers under the needle clip, to raise the needles. The main jet only came in one size, so I drilled it out with ity-bity, expensive, jet drills. I could move the miss around, but I could not get rid of it. From the beginning I told the guy it wouldn’t work and that he was wasting his money, and that at the least we needed carbs we could get parts for, but nooo. Just rise the needles, drill the jets he said… $200 later he finally gave up. I guess I shouldn’t complain, I did get paid… but !
But you want to try it, don’t you ? OK, the drill really isn’t that hard. Simply run the engine at whatever throttle opening you want to test, for a mile or so, and look at the spark plug. Is the spark plug reading lean or rich ? Now look for the jet that controls that particular throttle opening and exchange it for a richer or leaner one. Now that doesn’t sound very hard, does it ? Oh yes, the throttle transition from one jet to the next must be smooth too ! Go back over the areas that each jet controls. They overlap each other. Some a little, some a lot. Make sure you have a good selection of jets ! Most carb manufacturers have tables of specifications on the jet needles and needle jets, and other jets that you will find very useful. With these specs you can make a better guess as to what jet will work best. Some places use motorcycle dynamometers for testing.

These can be a big help to get real close to the best jet setting. Working out the best main jet for a 170 MPH bike can be quite unhealthy if you only have a freeway to test on ! Just remember one thing. A dynamometer is not the real world. A fact more then one factory has found out the hard way when their super hot, dyno tested, race machines didn’t run so fast in the real world, on real pavement, in real air with real bugs on the windscreen !
These can be a big help to get real close to the best jet setting. Working out the best main jet for a 170 MPH bike can be quite unhealthy if you only have a freeway to test on ! Just remember one thing. A dynamometer is not the real world. A fact more then one factory has found out the hard way when their super hot, dyno tested, race machines didn’t run so fast in the real world, on real pavement, in real air with real bugs on the windscreen !
Anyway, what I’m trying to get over to you is that just because your buddy said he got new carb, changed a jet or two and now his bike gets 100 miles per gallon and has double the horse power, doesn’t mean you can too ! It just might require a lot more work than you bargained for.
Look on the bright side. Carbs used to be real simple at the turn of the century, but they didn’t work as good as today’s carbs.
Oh, one last thing, seeing how we are talking carb theory. When an engine is cold, like when you first start it up. It doesn’t evaporate the gas well. Liquid gas does not burn, so you have to put in lots of gas, because a lot of it does not vaporize. The choke helps the carb to put into the engine a very rich mixture, and at least some of that mixture will vaporize and burn.
I had one guy tell me that the reason for a rich mixture when starting was so the pistons would be lubed by the raw gas and spin the engine over easier so it would start ! He felt very strongly about this, so I didn’t say a thing. Like the Bible says, don’t cast your pearls before swine. (Matthew 7:6)
Tools For Repairing
Posted by blogengineeringindonesia pada Agustus 24, 2008

Tools. You have to have lots of tools to work on motorcycles. So what does that mean ? Do you have to go out and buy
a $2000 master tool set to do good work ? No, not at all. A basic tool kit is all you need. You can add tools as you need them.
It’s always nice to have pretty, shiny, new tools, but hey, the bolts don’t care. They’ll come apart with old tools, same as new.
Start looking around… garage sales, 2nd hand stores…tell your friends you’re looking for some tools. Most mechanics start out with
old, junky tools and upgrade as money allows. This means there are lots of old tools floating around. Maybe they will sell cheap or even
give them to you, so keep your eyes open for them !
If you are really new to tools, a good place to learn about what is out there is a tool catalog. Sears Craftsman tools put out a free one that is a
good place to start. Almost all my tools are Craftsman. There is a good reason for that…they are guaranteed forever ( well, maybe just till
they go out of business. ) If I break one, I just take it back to Sears, and they give me a new one. I’ve fished them out of dumpsters, bought
broken ones from junk yards and take them back and I get a new one. There are others who give a lifetime warrenty, but I always know where a
Sears is. I don’t always know where the other guys are.
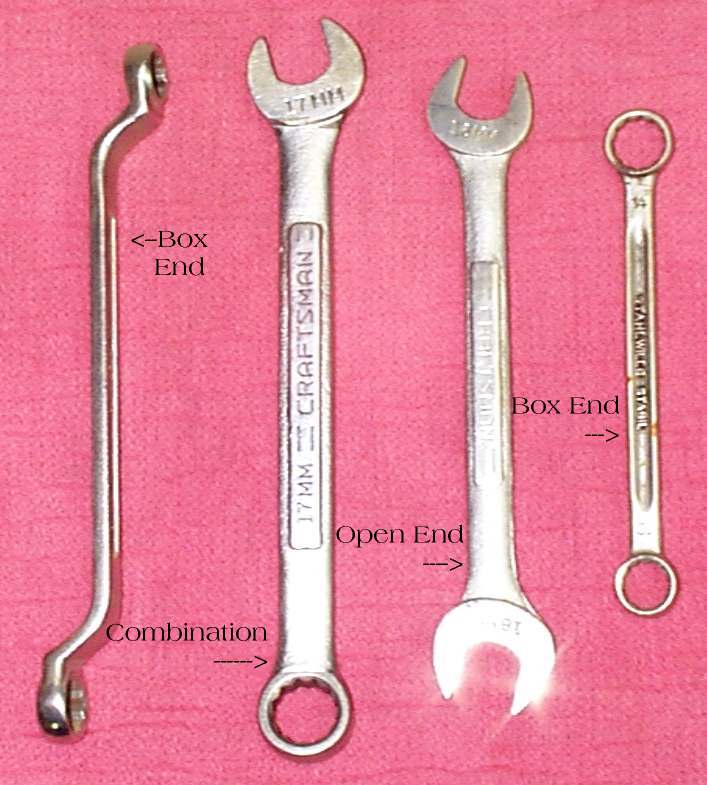
To start with you’re going to need some wrenches. Wrenches come in lots of types
and sizes. The handiest ones are Combination Wrenches. You will need sizes 6mm through 14mm, 17mm and 19mm to start. Two sets are nice, one for
the nut and one for the bolt head. A set of small, open end ignition wrenches is handy. Especially if the bike you are working on has points.
A set of inch (US) wrenches would be good too.

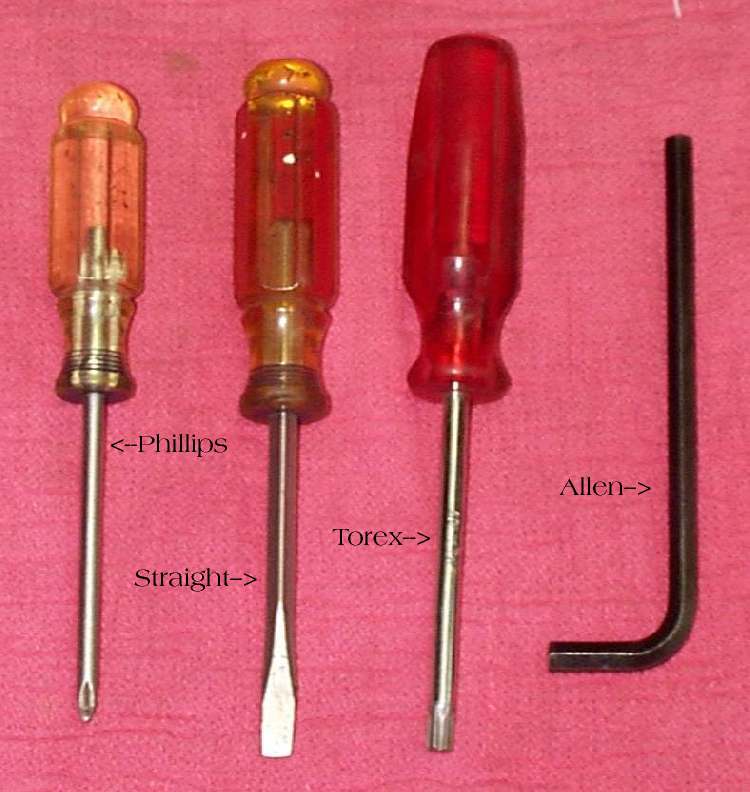
You will need lots of Screw Drivers. Small ones, large ones, big, long ones, small,short ones, short big ones and long small ones.
Well, you get the idea. There are all kinds of weird screw heads. Besides the ones we all know, Straight and Phillips, there are Allen, Torex, Square
and others. You will also use them for all kinds of unauthorized prying, chisling, levering and such. As Red Green says ” Any tool can be the right tool.”

The Impact Driver is a must have tool. The steel Phillips head screws used on a large number of motorcycles really lock onto the threads in the
aluminum crankcases. You must have an Impact Driver to get them out. Impact Drivers come in both 3/8″ and 1/2″ drives. You can use screw driver bits
or sockets with them. To use an impact driver first select the right size of bit, then put it on the driver and onto the screw. Turn the body of the
driver in the direction you want to turn. This ” cocks ” the tool, so to speak. Now hit it on the end, with a hammer, good and hard, and off it comes…
the screw, that is. Remember to back up the part. If the part with the screw in it is not strong enough to take the hammer blow, it will break.

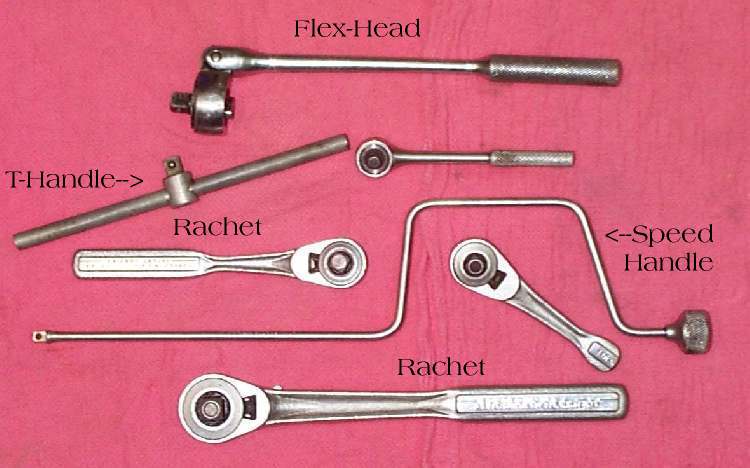
Sockets come in 6, 8, and 12 points and 1/4″, 3/8″, 1/2″, and bigger drives. The points refer to the way the socket grips the bolt or nut.
6 and 12 point work on hex head bolts and nuts. The 6 point has a very strong grip on the hex head. the 12 point has a weaker grip
 but allows the
socket to go on the bolt easier. I always try to get 6 point sockets. I don’t think the 12 point are that useful. The drive refers to the
square that is used to drive the socket. 8 point sockets are used on the square nuts seen on farm machinery. You will need sockets in the
same sizes as your wrenches. Sockets below 10mm will use 1/4″ drive handles. 3/8″ drive goes from 10mm up to 19mm. 1/2″ drive goes from 10mm
on up to 36mm or so. 3/8″ seems to be the drive to use for most bike work.

The handles for these sockets come in all kinds of shapes, sizes, and styles. T-Handles are handy, as are rachet handles. Just pick the ones you like.

Socket extensions come in all sizes from 1 1/2″ long on up. Get several. You can hook them together to get any length extension you want.
 Pliers are useful for holding things tightly. They come in lots of shapes and sizes. Vice-Grip types are very useful. If you only have one make it a medium sized Vice-Grip. Better yet, get a whole bunch of them, you will use them.

No good mechanic ever uses a Crescent Wrench…but we all have a good selection of them hidden in our tool box ! Now you would think that with as many
tools as I have, I would always have exactly the right wench for every nut and bolt. But, you would be wrong. I am always running across
bolts that nothing fits. For those bolts, I keep the trusty Crescent Wrench. So tell everyone you never use a Crescent Wrench and keep a good supply of them !

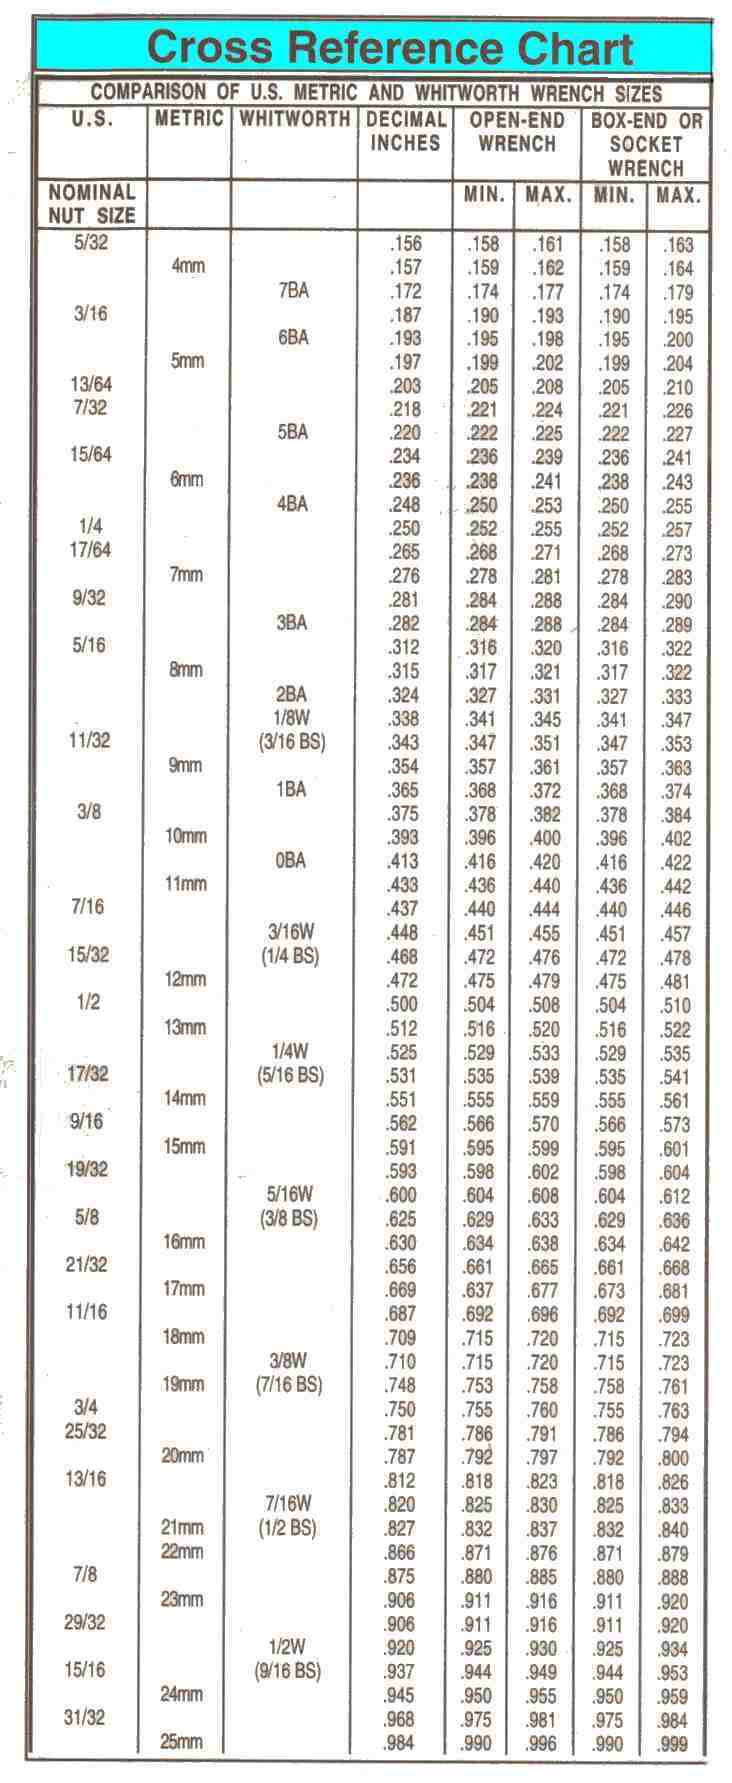
If it’s a British bike like Triumph, BSA, Norton and the like, it will have nuts and bolts that are British Standard. These are also called Whitworth. You will need a set of these Wrenches if you work on British stuff.
Speaking about funny sized bolts, from time to time you will run across bolts and nuts that are rounded off or it’s a weird size. If you measure the
bolt and compare it with this chart, you will be able to select a socket or wrench that is pretty close in size. Print it out and put it in your toolbox. My thanks to Flanders Co., a motorcycle parts distributor, for giving me permission to reprint this chart from their catalog.
There are lots of other tools out there and the ones you will want will depend on the job you are doing. If you are just starting your tool box, here is what I would consider a good start.
a $2000 master tool set to do good work ? No, not at all. A basic tool kit is all you need. You can add tools as you need them.
It’s always nice to have pretty, shiny, new tools, but hey, the bolts don’t care. They’ll come apart with old tools, same as new.
Start looking around… garage sales, 2nd hand stores…tell your friends you’re looking for some tools. Most mechanics start out with
old, junky tools and upgrade as money allows. This means there are lots of old tools floating around. Maybe they will sell cheap or even
give them to you, so keep your eyes open for them !
If you are really new to tools, a good place to learn about what is out there is a tool catalog. Sears Craftsman tools put out a free one that is a
good place to start. Almost all my tools are Craftsman. There is a good reason for that…they are guaranteed forever ( well, maybe just till
they go out of business. ) If I break one, I just take it back to Sears, and they give me a new one. I’ve fished them out of dumpsters, bought
broken ones from junk yards and take them back and I get a new one. There are others who give a lifetime warrenty, but I always know where a
Sears is. I don’t always know where the other guys are.
To start with you’re going to need some wrenches. Wrenches come in lots of types
and sizes.
 The handiest ones are Combination Wrenches. You will need sizes 6mm through 14mm, 17mm and 19mm to start. Two sets are nice, one for
the nut and one for the bolt head. A set of small, open end ignition wrenches is handy. Especially if the bike you are working on has points.
A set of inch (US) wrenches would be good too.
You will need lots of Screw Drivers. Small ones, large ones, big, long ones, small,short ones, short big ones and long small ones.
Well, you get the idea. There are all kinds of weird screw heads. Besides the ones we all know, Straight and Phillips, there are Allen, Torex, Square
and others. You will also use them for all kinds of unauthorized prying, chisling, levering and such. As Red Green says ” Any tool can be the right tool.”
The Impact Driver is a must have tool. The steel Phillips head screws used on a large number of motorcycles really lock onto the threads in the
aluminum crankcases. You must have an Impact Driver to get them out. Impact Drivers come in both 3/8″ and 1/2″ drives. You can use screw driver bits
or sockets with them. To use an impact driver first select the right size of bit, then put it on the driver and onto the screw. Turn the body of the
driver in the direction you want to turn. This ” cocks ” the tool, so to speak. Now hit it on the end, with a hammer, good and hard, and off it comes…
the screw, that is. Remember to back up the part. If the part with the screw in it is not strong enough to take the hammer blow, it will break.
Sockets come in 6, 8, and 12 points and 1/4″, 3/8″, 1/2″, and bigger drives. The points refer to the way the socket grips the bolt or nut.
6 and 12 point work on hex head bolts and nuts. The 6 point has a very strong grip on the hex head. the 12 point has a weaker grip
socket to go on the bolt easier. I always try to get 6 point sockets. I don’t think the 12 point are that useful. The drive refers to the
square that is used to drive the socket. 8 point sockets are used on the square nuts seen on farm machinery. You will need sockets in the
same sizes as your wrenches. Sockets below 10mm will use 1/4″ drive handles. 3/8″ drive goes from 10mm up to 19mm. 1/2″ drive goes from 10mm
on up to 36mm or so. 3/8″ seems to be the drive to use for most bike work.
The handles for these sockets come in all kinds of shapes, sizes, and styles. T-Handles are handy, as are rachet handles. Just pick the ones you like.

Socket extensions come in all sizes from 1 1/2″ long on up. Get several. You can hook them together to get any length extension you want.
 Pliers are useful for holding things tightly. They come in lots of shapes and sizes. Vice-Grip types are very useful. If you only have one make it a medium sized Vice-Grip. Better yet, get a whole bunch of them, you will use them.
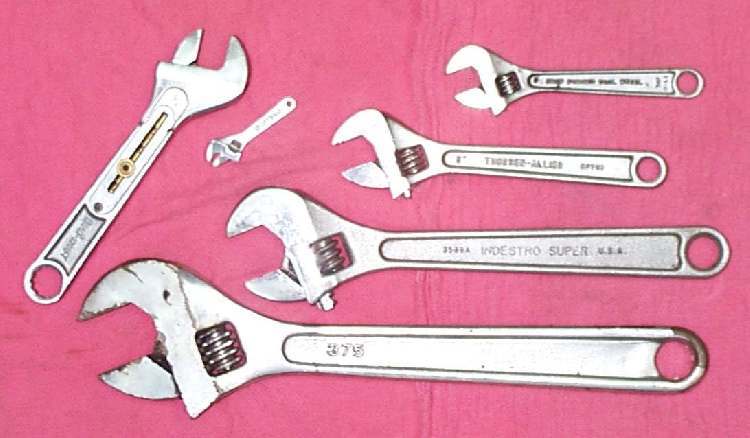
No good mechanic ever uses a Crescent Wrench…but we all have a good selection of them hidden in our tool box ! Now you would think that with as many
tools as I have, I would always have exactly the right wench for every nut and bolt. But, you would be wrong. I am always running across
bolts that nothing fits. For those bolts, I keep the trusty Crescent Wrench. So tell everyone you never use a Crescent Wrench and keep a good supply of them !
If it’s a British bike like Triumph, BSA, Norton and the like, it will have nuts and bolts that are British Standard. These are also called Whitworth. You will need a set of these Wrenches if you work on British stuff.
Speaking about funny sized bolts, from time to time you will run across bolts and nuts that are rounded off or it’s a weird size. If you measure the
bolt and compare it with this chart, you will be able to select a socket or wrench that is pretty close in size. Print it out and put it in your toolbox. My thanks to Flanders Co., a motorcycle parts distributor, for giving me permission to reprint this chart from their catalog.
There are lots of other tools out there and the ones you will want will depend on the job you are doing. If you are just starting your tool box, here is what I would consider a good start.